
l have been meaning to write this for a while. This isn’t any sort of guide on how to rat, but a checkpoint wherein I describe how I currently approach the task. It is one of those posts that I wish I had written, say, yearly, just to see how things progressed. I expect people will comment to tell me I am doing it wrong, which is welcome, if only so that others might learn from my mistakes.
If I had written this a year ago it would have been about fighting the Guristas menace. But now we live in Delve and it is the Blood Raiders we seek to suppress.
Also, this post should not be confused with the Crimson Harvest event, which is kicking off today. I only realized that was hitting today after I had written most of this, so the timing is coincidental. But I’ll still use the Blood Raiders graphic from event.

Blood Raiders! Wooo!
My ratting ship of choice is the Ishtar, and I am still using the same hull I hauled down from the north in my carrier a couple of months back. Or maybe I flew it down on its own. I don’t remember off hand. Anyway, I have since refit the modules and now run it with an armor tank rather than a shield tank as I did previously.
The main defensive modules on my Ishtar are a Reactive Armor Hardener, which nicely adapts to whatever damage type is being thrown at you (EM and thermal in the case of the Blood Raiders), a Medium Armor Repairer II, which keeps the armor belt on the ship repaired, and a 100MN afterburner that keeps the whole thing moving along fast enough to avoid fire without increasing the ship’s signature radius. Most everything else fitted are modules to enhance drone range, speed, or damage.
Ratting, as I do it, consists of taking out anomalies in the system which I call home. The term always conjures up the mental image of hunting asteroid belt rats back in the day. Our home has an upgraded ihub and affords a range of targets when I open up the scanner.

What I see on the scanner
There is a whole hierarchy of difficulty in anomalies, which you can read about over at EVE University. Out of habit or tradition or whatever, I always run the local flavor of Forsaken Hubs. Somebody (Gaff I think) once told me that they were the best effort to ISK value. At one time they were very easy, because they spawned nothing smaller than a cruiser and never used tackle or ewar. That got changed a while back, and now there are frigates that will point you.
Forsaken Hubs tend to be popular and if I find them all occupied I step up to Havens, which yield more ISK but are also more work.
When it is time to rat, I undock from the citadel and choose a Forsaken Hub from the list of Cosmic Anomalies. I warp off to the one I have chosen… you can just right-click or click on the “warp to” button… with an overview up that shows blues. If I land and see somebody else in the anomaly, I move off to another one. If the anomaly is empty, has no wrecks, and shows the starting wave (which is always the same) I settle in to fight.

The broken orange crystal asteroid, the center piece of all forsaken hubs
The first thing I do is make sure my hardeners are on. Then I deploy my mobile tractor unit. That will collect up all the wrecks and loot them for me. After that is deploying I set myself to orbit the MTU at 25km and turn on the afterburner. At about that point the Blood Raider ships are generally waking up to the fact that I have arrived and start targeting me.
This is where I sometimes forget to save the location of the MTU as a bookmark. I will want to come back to that spot after the anomaly despawns and is no longer on the scanner. So far I have only lost a single MTU because of this, but it is still an “Oh yeah, I need to do this!” part of the routine. I also swap to the an overview that only shows hostiles, NPC or otherwise.
Once all the NPCs have me locked and are shooting at me (red boxed) I launch my drones and send them after one of the battleships. Every so often the first wave will suddenly change its mind and target one of my Praetor II heavy drones and I have to call it back. Once it is back in the drone bay fire generally resumes on me and I send out a replacement drone to join the fight.
The point of maximum incoming damage generally happens when my ship is motoring out to its orbital range. Once in a while that happens in such a way that my path lines up with the hostile lasers and every shot is a hit and I have to change course. But once I am out in my orbit and past about 750 m/s in velocity, most shots miss.

Lots of shots, not many hits on me
After that, the anomaly is pretty hands off. The drones, set to group and be aggressive, just move from target to target blowing them off. I will mention the drone settings if only because for the longest time I did not know they existed and used to have the “problem” of my drones running off and picking individual targets. The “focus fire” option fixed that for the most part.

Drone Window Settings
At this point I usually find something else to do while the anomaly runs. I keep an eye on local and the intel channel and the health of my drones, just in case, as I work on bills or outline a blog post or go through screen shots or play a game on the iPad. Last night I filled in my vote by mail ballot while running a forsaken hub. It is not exciting game play and I cannot bring myself to do more than two anomalies at a sitting. I get restless. But if I have something else to work on, it is at least a lucrative side activity.
Our intel channel is quite active and the only time I haven’t had a lot of warning about somebody coming our way is when they came through a wormhole in our system. I still have to click on the systems where hostiles are reported now and again to see how far away they are, but I am starting to learn the nearby systems.
When the waves with frigates come up I generally step in, target them, and make the drones kill them off first. Then the rest of the wave runs by itself.

Drones take care of another NPC
At the end I will have blown up ~40 ships. The first few waves are consistent, the final couple seem to vary as the wreck count and the bounties paid out seem to fluctuate from one run to another. The bounties totally up to about 25-28 million ISK per run.
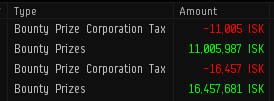
I made this much ISK while voting
Once the last NPC ship is down, I head back to the MTU and scoop in the cargo hold so I don’t forget it. Then I load up whatever loot is left in the can that the MTU leave behind. The Ishtar’s hold can sometimes carry all of the loot. Even when it cannot, all that is left are usually a couple of larger items like smart bombs.
Then I warp back to the citadel and dock up. If I have a damaged drone, I stay tethered a bit before docking to let the citadel repair it. (The repair progress doesn’t actually show, but when I go out again the drone is repaired.) Once docked I take all the drops and move them into the cargo bay of the blockade runner I use to move loot so it doesn’t clutter up my hangar. Then I swap over to my Noctis.

The Noctis
The Noctis is fit with salvage rigs and a full set of salvagers in the high slots. I warp it off to the bookmark, as the anomaly has generally despawned by that point. If I get the pop-up that indicates that it hasn’t, I usually hold off a minute or two and sit there tethered. Etiquette as I was taught is to let your anomaly despawn before you go back to finish looting so as not to hold up the next spawn, as only so many of each anomaly can be present in the system at one time.
Once I arrive at the bookmark I pick up any remaining loot and then set about salvaging all of the wrecks that were piled up at the MTU. I used to leave the MTU and all the loot for the Noctis to pick up, but then I kept forgetting to move the MTU back into the cargo hold of the Ishtar. Coming up with a routine that minimizes errors is a priority for me.

Digging into the salvage
Once the site has been swept clean, it is back to the citadel to drop the salvage and remaining loot in the blockade runner. (Also, it is surprisingly difficult to get all the salvagers running on individual wrecks then turn off the UI and take a decent screen shot before some of them have cycled and turned off.)
Eventually the blockade runner starts to fill up and I have to figure out what to do with all of the loot. Back up in the north, when shipping to Jita was cheap, I used to send it all there to be sold. Now with shipping being more than double the price, I pick through what to send to Jita and what to sell locally. There are lots of low ball buy orders to ignore, but for things like salvage there are some that are competitive with Jita prices, so I sell locally.
Some things are just over saturated in Jita so the prices are depressed. Propulsion modules seem to be a bit too common in Jita, so I tend to just list them all at our staging base where I get a much better price. They sell out pretty quickly. Other items get shipped back to Jita to be sold. All told, the loot side of running an anomaly can generate almost as much as the bounty side of things, though getting that ISK is much more hands on.
That is my ratting routine, such that it is. It isn’t nearly as lucrative as my selling skill injectors, something I can do from the safety of Jita 4-4, though that business makes ISK mostly because I don’t care about buying PLEX for that account. I just buy skill extractors, pull skill points out every 8 days, and sell the injectors, pocketing 300+ million ISK in the process. But ratting still puts some ISK in my pocket and is something I can do when I have other, real world things to do as well.

You don’t have access to a buy-back service? In KF we have a guy (Faud) who buys all of your loot at decent prices. The only stuff I save and ship to Jita are the rare drops that go for 100m+. Everything else is dumped in a contract, which makes things very easy (his website does all of the price calculating for you as well).
Another difference is I will fly my Noctis with its MTU into the site once the first wave is down to just BS rats (I run Havens and sometimes a Sanctum with my Rattlesnake), drop the MTU, and fly back to tether at the Cit. By the time the Rattle is done with the site, most of the wrecks are at the MTU, then as the Rattle starts the next one, the Noctis cleans up the first site, scoops the MTU, and flies to the one already in progress. Generally the Noctis keeps up with the Rattle pretty well, and after 3 sites its cargo hold fills up.
LikeLike
@SynCaine – I’ve only seen a couple of buy back offers in S-Mart, one that will give you the mineral price of your loot because they are just reprocessing it for production (There is some stuff where that would be okay, but not much. I make out better selling myself.) and Pokano’s, who only wants very specific items. I haven’t checked within TNT, but I doubt we have anything there.
And this is my “one character” ratting routine. When I happen to have both characters sitting in my home system, I have a backup Ishtar that I hand over to the alt, I fleet them up, and have them run hubs in parallel if the system isn’t too busy, then get the Noctis out to sweep up while the alt starts on a third.
I was actually on something of a cash binge during the war, worrying out SRP being curtailed, but that never happened, I never lost anything expensive, and I ended up with more ISK than ever. So now I have an Apostle on order and I just bought a Barghest for the Reavers deployment. We’ll see how that works out.
LikeLike
NPC aggression typically won’t change more than twice. I find that if you wait to drop drones until after you’re red-boxed by the full swarm, you can attack freely. On occasion, it will switch to your drones. If you pull them and let the aggro return to you, you should be fine (I’ve never needed to do this more than twice). If, however, you land, drop drones, and begin attacking before you’re fully red-boxed, each spawn will attack your drones first.
I’ve also noticed that rats will target based on size. So, frigate rats will leave heavy drones alone, but will always swap to attack your drones if you drop small drones. Back when you could fly with drones in your carriers, this was a tactic to break warp scrams against lvl 5 mission carriers; when you were tackled, align out and drop light drones, then warp out when the aggro for the scrambling frigates shifts to your drones. Sort of an emergency measure.
LikeLike